前回の記事では、Varnish CacheとMagentoのWebサイトでのセットアップ方法について説明しましたが、それだけでは十分ではありません。
本記事では後編としてシステムレイヤーにVarnishCacheをインストールして構成する方法について紹介します。また、VarnishバックエンドおよびUbuntuなどNginxWebサーバーに基づいて書きます。
MagentoのストアがApacheを利用している場合、次の情報を自分の環境に適用することは、構成ファイルの構文を変換する問題がありますが、やり方は同じです。
開始する前に、完全に機能するMagento2(以下「2」略)がインストールされていることを確認してください。
また、MagentoソースコードにバンドルされているNginx構成ファイル(nginx.conf.sample)を独自のNginx構成の開始点として使用していると仮定して説明します。
Magento
Magentoストアの構成については、「MagentoへのHTTP Cache, Varnish Cache 及びVarnish Cache構成について」の記事を参照してください。
やることはただ次のコードをMagentoのenv.phpにペストすることです。これは、管理画面でMagentoキャッシュをフラッシュするときにVarnishキャッシュを純粋にするのに役立ちます。
| ‘http_cache_hosts’ => [ [ ‘host’ => localhost, ‘port’ => ’80’ ] ] |
Nginx
Varnishリバースプロキシのアイデアは、ポート80に接続することです。そのため、他のポート(例えば8080など)をリッスンするようにMagentoストアを変更します。
したがって、最初にすべきことは、ポート80からNginxのフックを解除することです。
バーチャルホストファイルを変更しましょう。
# Other http context directives...

server {
    # Other server context directives...

    listen 80 default_server;
    listen [::]:80 default_server;

    # Other server context directives...
}

# Other http context directives...
|
から
# Other http context directives...

server {
    # Other server context directives...

    listen 8080 default_server;
    listen [::]:8080 default_server;

    # Other server context directives...
}

# Other http context directives...
|
に変更します。
ここで注意すべきなことは1点あります。それはVarnishはSSLを終了することができないことです。ポート443でリッスンし、SSL証明書を使用してHTTPSトラフィックを復号化することはできません。
Nginx(およびApache)はSSLトラフィックを完全に復号化できるため、その目的でそれを引き続き使用します。また、復号化されたHTTPSトラフィックをポート80にプロキシして、通常どおりNginxからのサービスを受けます。
したがって、次のようにバーチャルホストファイルを変更する必要があります。
# Other http context directives...

server {
    listen 443;
    listen [::]:443;

    # Other server context directives...

    ssl                  on;

    ssl_certificate      /etc/ssl/certs/certificate.crt;
    ssl_certificate_key  /etc/ssl/private/private.key;
    ssl_protocols        TLSv1.1 TLSv1.2;

    # Other ssl_* server context directives...

    # Proxy
    location / {
        proxy_pass http://127.0.0.1:80;
        proxy_set_header X-Real-IP  $remote_addr;
        proxy_set_header X-Forwarded-For $proxy_add_x_forwarded_for;
        proxy_set_header X-Forwarded-Proto https;
        proxy_set_header X-Forwarded-Port 443;
        proxy_set_header Host $host;
    }
}

# Other http context directives...
|
次にサーバーコンテキストの外部に以下のものを追加して、Nginxバーチャルホストのポート8080を変更します。
# Other http context directives...

# Vagrant - support HTTPS behind reverse proxy
map $http_x_forwarded_proto $fastcgi_https {
    default $https;
    https on;
}

server {
    listen 8080 default_server;
    listen [::]:8080 default_server;

    # Other port 8080 directives...
}
|
このコードは、$ fastcgi_https変数に、プロキシの背後にない場合はNginxが独自に処理するHTTPSのデフォルト値を入れ、プロキシの背後にある場合、およびX-Forwarded-Protoがhttpsの場合に「ON」の値を入れます。
さらに、プロトコルスキームを正しく検出するために、Magentoが使用するPHP $ _SERVERスーパーグローバル配列にこのフラグを渡すために、fastcgi_paramを使用してPHPファイルを処理するNginxのポート8080のバーチャルホストロケーションブロックを変更する必要があります。
# Other server context directives...

location ~ (index|get|static|report|404|503)\.php$ {
    # Other location context directives...

    # Support HTTPS behind reverse proxy
    fastcgi_param HTTPS $fastcgi_https;

    # Other location context directives...

    include        fastcgi_params;
}

# Other server context directives...
|
以下は、構造の図です。
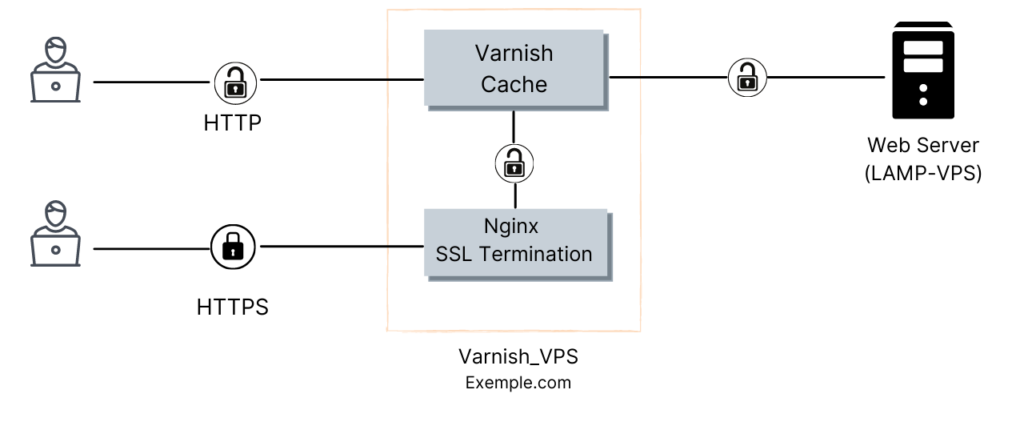 Varnishキャッシュシステムの構造
Nginx構成をテストして、変更が効果であることを確認する必要があります。
$ sudo nginx -t nginx: the configuration file /etc/nginx/nginx.conf syntax is ok nginx: configuration file /etc/nginx/nginx.conf test is successful |
テストが終わったら、Nginxを再起動します。
$ sudo service nginx restart |
Varnish
最後に、Varnishリバースプロキシをインストールして構成する必要があります。
Varnishのインストールに進みます。↓
$ sudo apt-get install -y varnish |
次にデーモンオプションを調整してポート80でリッスンするようにVarnishを構成し、Magento管理画面からエクスポートしたvarnish.vclファイルを使用するようにVarnishデーモンに指示する必要があります。
最初のステップは、varnish.vclファイルを本番サーバーの/etc/varnish/varnish.vclの場所にコピーすることです。
続いて、説明されているようにVarnishデーモンオプションを調整し、Varnishを再起動する必要があります。
追って関連するリサービスが機能しているかどうかを確認する必要があります。
$ ps -e | egrep 'nginx|varnish' 1174 ? 00:00:00 varnishd 1175 ? 00:00:04 varnishd 1860 ? 00:00:00 nginx 1861 ? 00:00:00 nginx 1862 ? 00:00:00 nginx |
上記のような出力を受け取った場合は、すべてのシステムが準備済みの状態であるため、Magentoフロントエンドを確認することができます。
そのために、VarnishにバンドルされているVarnishlogを使用できます。
厳密に言うとVarnishが構成済みのバックエンドに接続する必要があるリクエストのみを表示するコマンドが生成されます。この場合はMagentoがポート8080で動いています。
特定のMagentoページをロードする場合 、リクエストはVarnishによってキャッシュされ、同じページの後続のロード時に、リクエストはMagentoに接続せずにVarnishによって処理されます。
Varnishlogコマンド↓
$ varnishlog -b | grep 'TxURL'
|
以上になりますが、EコマースビジネスソリューションまたはMagentoのWebサイトに興味がある場合、またサポートが必要な場合は弊社へお問い合わせ頂くと幸いです。
=====================
This post is the continuation of the post Introduce HTTP Caching and Varnish Cache in Magento 2. In the previous post, I have shown you about Varnish Cach and How to set up it on Magento website, and that’s not enough to work. Now, let me help you to install and configure the Varnish Cache on the System layer. Let dive into it.
This post is written based on the Nginx web server as Varnish backend and Ubuntu. Even if the store in question is powered by Apache, applying the following information to your environment should just be a matter of translating configuration file syntax, but the idea is the same.
Before starting, make sure that you have a fully functional Magento installation, and I’ll assume you used the Nginx configuration file bundled with Magento source code – nginx.conf.sample as starting point for your own Nginx configuration.
Magento
About Magento store configuration, please refer to the post Introduce HTTP Caching and Varnish Cache in Magento 2.
There is one point you need to do is pass the bellow code to Magento env.php file, It helps to pure the Varnish cache when you flush the Magento cache in admin.
| ‘http_cache_hosts’ => [ [ ‘host’ => localhost, ‘port’ => ’80’ ] ] |
Nginx
The idea of Varnish reverse proxy is to hook it up to port 80, so change your Magento store to listen to the other port (like 8080 as an example).
Therefore the first thing you should do is to unhook Nginx from port 80. Let change the virtual host file:
From:
# Other http context directives...

server {
    # Other server context directives...

    listen 80 default_server;
    listen [::]:80 default_server;

    # Other server context directives...
}

# Other http context directives...
|
To:
# Other http context directives...

server {
    # Other server context directives...

    listen 8080 default_server;
    listen [::]:8080 default_server;

    # Other server context directives...
}

# Other http context directives...
|
There is one point that you need to attention – Varnish can not terminate SSL. It can not listen on port 443 and decrypt HTTPS traffic using your SSL certificate. Since Nginx (as well as Apache) is fully capable of decrypting SSL traffic, we’ll keep using it for that purpose, and we will then proxy decrypted HTTPS traffic to port 80 to be served by Nginx as usual.
So, you have to change the virtual host file like bellow:
# Other http context directives...

server {
    listen 443;
    listen [::]:443;

    # Other server context directives...

    ssl                  on;

    ssl_certificate      /etc/ssl/certs/certificate.crt;
    ssl_certificate_key  /etc/ssl/private/private.key;
    ssl_protocols        TLSv1.1 TLSv1.2;

    # Other ssl_* server context directives...

    # Proxy
    location / {
        proxy_pass http://127.0.0.1:80;
        proxy_set_header X-Real-IP  $remote_addr;
        proxy_set_header X-Forwarded-For $proxy_add_x_forwarded_for;
        proxy_set_header X-Forwarded-Proto https;
        proxy_set_header X-Forwarded-Port 443;
        proxy_set_header Host $host;
    }
}

# Other http context directives...
|
Next step, we will modify port 8080 Nginx virtual host by adding the following outside of server context:
# Other http context directives...

# Vagrant - support HTTPS behind reverse proxy
map $http_x_forwarded_proto $fastcgi_https {
    default $https;
    https on;
}

server {
    listen 8080 default_server;
    listen [::]:8080 default_server;

    # Other port 8080 directives...
}
|
This code will populate $fastcgi_https variable with the default value of HTTPS that Nginx handles on its own when not behind a proxy, and with the value on when behind a proxy and when X-Forwarded-Proto is https. Furthermore, we must modify Nginx port 8080 virtual host location block which handles PHP files using fastcgi_param, in order to pass this flag to PHP $_SERVER superglobal array used by Magento to correctly detect protocol scheme
# Other server context directives...

location ~ (index|get|static|report|404|503)\.php$ {
    # Other location context directives...

    # Support HTTPS behind reverse proxy
    fastcgi_param HTTPS $fastcgi_https;

    # Other location context directives...

    include        fastcgi_params;
}

# Other server context directives...
|
And below is an illustration of the architecture:
You must test our Nginx configuration to make sure your change is the effect.
$ sudo nginx -t nginx: the configuration file /etc/nginx/nginx.conf syntax is ok nginx: configuration file /etc/nginx/nginx.conf test is successful |
If test is successful, we can restart Nginx.
$ sudo service nginx restart |
Varnish
In the last step, You need to install and configure Varnish reverse proxy.
Proceed to install Varnish:
$ sudo apt-get install -y varnish |
Next, you need to configure Varnish to listen on port 80 by adjusting its daemon options as well as instruct Varnish daemon to use varnish.vcl file we exported from Magento Admin panel. The first step is to copy varnish.vcl file to your production server, to /etc/varnish/varnish.vcl location.
Next, you need to adjust Varnish daemon options as described and to restart Varnish
Now, you need to check whether relevant reservices are work.
$ ps -e | egrep 'nginx|varnish' 1174 ? 00:00:00 varnishd 1175 ? 00:00:04 varnishd 1860 ? 00:00:00 nginx 1861 ? 00:00:00 nginx 1862 ? 00:00:00 nginx |
If you received output like the one from above, all systems are green and you’re ready to check your Magento frontend.
For that purpose, you can use varnishlog which comes bundled with Varnish, more precisely a command crafted to show only requests for which Varnish had to contact its configured backend, in this case, Magento running on port 8080. When you load a specific Magento page, the request will get cached by Varnish, and on the subsequent load for the same page, the request will get served by Varnish without contacting Magento.
Varnishlog command:
$ varnishlog -b | grep 'TxURL'
|
Lastly, if you are interested in an eCommerce business solution or Magento website, please contact us if you need help.
Magentoの本番環境構築やVarnish Cache設定を含むインフラ整備を専門チームに相談したい場合は、Magento 構築・リニューアル支援にご相談ください。
よくある質問
VarnishはHTTPSに対応していますか?
Varnish自体はSSLを終端できないため、ポート443でのHTTPSトラフィックを直接復号化することができません。一般的な構成では、NginxがSSL(ポート443)を終端した後、復号化したHTTPトラフィックをVarnish(ポート80)にプロキシし、VarnishがバックエンドのNginx(ポート8080)に転送する形をとります。
MagentoにVarnishキャッシュを導入するとき、Nginxのポート設定はどう変更しますか?
VarnishがポートPort 80を占有するため、NginxのバーチャルホストをポートPort 8080に変更する必要があります。またMagentoのenv.phpに「http_cache_hosts」設定を追加することで、管理画面からMagentoキャッシュをフラッシュした際にVarnishキャッシュも同期して削除されるようになります。
Varnishが正常に動作しているかどうかはどうやって確認しますか?
VarnishバンドルのVarnishlogコマンド(varnishlog -b | grep TxURL)を使うと、Varnishがバックエンドへ接続したリクエストのみを表示できます。特定ページを2回ロードして2回目のリクエストがVarnishlogに現れなければ、キャッシュが機能している証拠です。
Varnish導入時に「ps -e | egrep ‘nginx|varnish’」で確認できる正常状態はどのようなものですか?
varnishdプロセスが2つ(親・子)、nginxプロセスが複数(マスター+ワーカー)表示されれば正常です。これが確認できたらMagentoフロントエンドにアクセスしてVarnishキャッシュが動作しているか確認できます。
弊社ではMagentoを利用した多機能ECサイトの構築・越境EC/中国越境ECの開発をして企業様をサポートしています。 ご興味ある方は是非問い合わせください。