キャッシュ(Cache) は、ユーザーエクスペリエンス(UX)に直接影響するため、多くの場合、Webベースのビジネスにとって重要なソフトウェアです。
この投稿では、HTTP Caching (HTTPキャッシング)とVarnish Cache (Varnishキャッシュ)の定義やVarnishキャッシュを使用するようにMagentoを構成する方法をご紹介させていただきます。
まず、HTTPキャッシングとそのインスタンスであるVarnish Cacheについてご説明いたします。
HTTP Caching (HTTPキャッシング)について
HTTPキャッシングは、HTML、StyleSheet(CSS)、Javascript(JS)などの静的ファイルのコピーをクライアント側(ブラウザー)に保存し、要求された際にそれを提供する手法です。
これにより、遅延とネットワークトラフィックが削減されます。
HTTPキャッシングを利用することにより、Webサイトの応答性が向上させます。
Webキャッシュのストアに要求されたリソースがある場合、元のサーバーから再ダウンロードする代わりに、要求をインターセプトしてそのコピーを返します。
以下の図を参照してください:
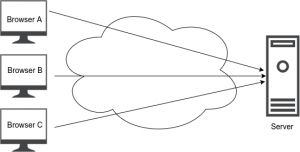 HTTP Cache なし
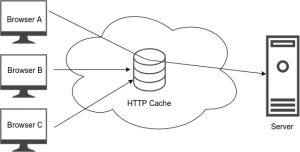 HTTP Cache 有り
キャッシングの制御 (The Cache-Control header)
HTTPヘッダーのCache-Controlフィールドは、キャッシュメカニズムの動作に関するディレクティブを制御および指定するために使用されます。
有効期限
Cache-Controlのmax-ageオプションというのは、リソースがキャッシュされる最大時間です。
上記の以外にも多くのオプションと構成もあります。
Varnish Cacheは、それらすべてを制御および処理することに役立ちます。
Varnish Cache(Varnishキャッシュ)について
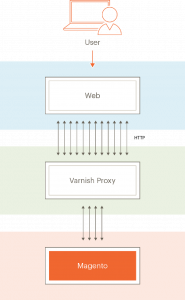
Varnish Cache(Varnishキャッシュ)は、キャッシングHTTPリバースプロキシとも呼ばれるWebアプリケーションアクセラレータです。
Varnish Cache は各サーバーの手前にインストールされていて、コンテンツをキャッシュするようにHTTPでそれを構成します。
 引用: https://devdocs.magento.com/guides/v2.4/config-guide/varnish/config-varnish.html
実装されたVarnish Cacheを使用すると、Webサイトのパフォーマンスが大幅に向上します。
Varnish-Cacheの詳細情報については、以下のリンクを参照して下さい。
https: // varnish -cache.org/intro/ .
VarnishはMagentoだけでなくさまざまなフレームワークをサポートしています。
Varnish Cache使用できる為のMagentoの構成方法
Magentoでは比較的簡単に利用できます。
- 管理者としてMagento Adminにログインする。
- Stores > Settings > Configuration > Advanced > System > Full Page Cacheをクリックする。
- Caching Applicationのリストから、Varnish Cachingをクリックする。
- パブリックコンテンツフィールドのTTLに値を入力する。
- Varnish Configurationを展開し、情報を入力する。
- Save Configというボタンをクリックする。
Varnish構成ファイルをエクスポートする。
Varnishを構成した後、Varnish構成ファイル(varnish.vcl)をエクスポートして、システムに配置する必要があります。
結論
この記事では、Varnish HTTP CacheというWebサイトのパフォーマンス効率を向上させるための強力なキャッシュアプリケーションかつMagentoを簡単に統合する方法を紹介しました。Varnishキャッシュをシステムへの設定および構成方法の詳細については次の記事で説明します。
=======================================
原稿:
The cache is often the most important piece of software for a web-based business because it directly affects User Experience (UX). In this post, I will introduce HTTP Caching and Varnish Cache as well as show you how to configure Magento to use Varnish Cache. Now, Let’s deep into it.
First of all, We have to know about HTTP Caching and Its instance –Varnish Cache.
HTTP Caching
HTTP Caching is a technique that stores a copy of static files such as HTML, StyleSheet (CSS), Javascript (JS) … to the client-side (Browser) and serves it back when requested. This reduces latency and network traffic. By making use of HTTP caching, Web sites become more responsive.
When a web cache has a requested resource in its store, it intercepts the request and returns its copy instead of re-downloading from the originating server.
Take a look at the following figure for a better understanding:
No HTTP Cache
HTTP Cache
Controlling caching (The Cache-Control header)
The Cache-Control field in the HTTP header is used to control and specify directives on how the caching mechanisms work.
Expiration
The max-age option in Cache-Control, which is the maximum amount of time in which a resource will be caching.
And lots of other options and configurations. Varnish Cache will help you to controlled and handled all of them .
Varnish Cache
Varnish Cache is a web application accelerator also known as a caching HTTP reverse proxy. You install it in front of any server that speaks HTTP and configures it to cache the contents.
source: https://devdocs.magento.com/guides/v2.4/config-guide/varnish/config-varnish.html
With the implemented Varnish Cache, the performance of your website is significantly increased. Varnish performs really, really well. We will not go into more detail in this post. You can also find more information about Varnish-Cache follow link https: // varnish -cache.org/intro/ .
Fortunately, Varnish supports a wide variety of frameworks as well as Magento 2.
Magento configure to use Varnish Cache
Magento made it easy for you to integrate this powerful tool. Now, let’s learn how to configure Varnish Cache in Magento 2.
To configure Magento to use Varnish:
- Log in to the Magento Admin as an administrator.
- Click Stores > Settings > Configuration > Advanced > System > Full Page Cache .
- From the Caching Application list, click Varnish Caching.
- Enter a value in the TTL for the public content field.
- Expand Varnish Configuration and enter the information.
- Click Save Config.
Export a Varnish configuration file
After configuring Varnish, you have to export the Varnish configuration file (varnish.vcl) and put it in your system.
Conclusion Through this article, I have introduced you to the powerful caching application that is the Varnish HTTP Cache to improve the performance efficiency of your website and How to Magento easily integrates it. More detail about How to Install and Configure The Varnish Cache to System will be mentioned in the later post. Thanks for your reading.
MagentoのVarnish Cache設定やサーバー構成まで含めた構築・最適化をご検討の場合は、Magento 構築・リニューアル支援のページもご確認ください。
よくある質問
Varnish CacheはHTTPキャッシングとどう違うのですか?
HTTPキャッシングはブラウザ側に静的ファイルのコピーを保存する手法で、遅延とネットワークトラフィックを削減します。Varnish Cacheはこれをサーバー側(リバースプロキシ)で実現するWebアプリケーションアクセラレータで、Cache-Controlヘッダーの制御を含む複雑なキャッシュルールをすべて処理します。
MagentoでVarnish Cacheを有効にするにはどこから設定しますか?
Magento管理画面で「Stores > Settings > Configuration > Advanced > System > Full Page Cache」を開き、「Caching Application」のリストから「Varnish Caching」を選択します。その後TTL値を入力し、Varnish Configurationを展開して情報を保存します。
Varnish設定後にVCLファイルのエクスポートが必要なのはなぜですか?
Magento管理画面での設定はMagento側の設定保存に過ぎず、Varnish自体はvarnish.vcl(Varnish Configuration Language)ファイルを読み込んで動作します。管理画面から設定値を入力した後、VCLファイルをエクスポートしてサーバー上に配置することで、Varnishが実際にそのルールでキャッシュを制御できるようになります。
Cache-Controlヘッダーのmax-ageは何を意味しますか?
max-ageはCache-Controlディレクティブのひとつで、リソースがキャッシュされる最大時間(秒)を指定します。この時間内であればキャッシュからコンテンツが返され、元のサーバーへの再リクエストが発生しません。Varnish CacheはこのHTTPヘッダーを解釈してキャッシュの有効期限を管理します。
弊社ではMagentoを利用した多機能ECサイトの構築・越境EC/中国越境ECの開発をして企業様をサポートしています。 ご興味ある方は是非問い合わせください。